Quick Start
Typically, the assistant is communicating with the assisted using Jitsi, the phone, their favorite IM, or whatever tool they like. Then starting Dayon! allows for watching live the assisted computer screen.
In this documentation, the screenshot show the English localisation of the app. The application itself is also completely localised in French, German, Italian, Spanish, Swedish, Russian, Turkish and Chinese (simplified). It will fall back to English, if the configured user language is none of the above.
Caution: This documentation refers to the most recent program version.
Preparing & Connecting
 Set up the Assistant computer
Dayon! Assistant is acting as a typical server application (the assisted is going to connect to) and as
such you've to configure your network to make it visible from the outside world.
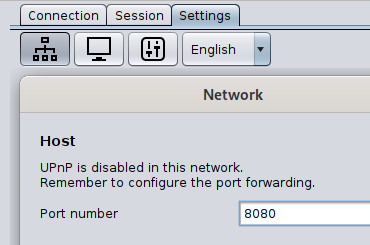
By default, the server listens to Port 8080, but you can change this if necessary.
Since version 12, Dayon! creates a corresponding port forwarding rule independently. The prerequisite for this
is that UPnP is activated.
Otherwise, it will still be necessary to forward the port (TCP) via NAT on the
router to the corresponding computer.
Check out portforward.com for a step-by-step guide for the most
common router models.
Optional: Adjust port for incoming connections: (on the left with UPnP, on the right without)

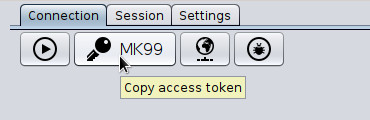
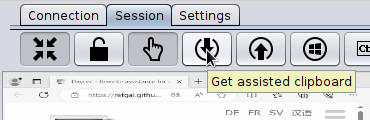
Generate and copy token
Generate an access token by clicking on the key. The generated token is directly copied to the clipboard, as soon it appears on the screen. (each mouse click generates a new token)
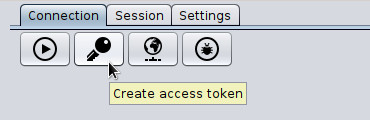
Note: If you are using some kind of VPN service like ZeroTier or such, you might want to select a specific network interface to be included in the token before generating.
That's it - communicate this Token to the assisted via mail, IM or phone.
For the impatient: Here you'll learn, how to make the assistant listening for incoming connections.
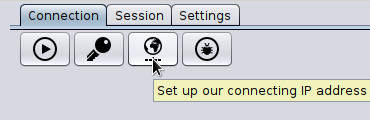
Alternative: connect without token
If you don't want to generate an access token, you have to determine which IP address you want
to share with the assisted to connect to the assistant; you should typically use your
public IP address.
But for testing within your local network you might want to use a different one. You can retrieve your
public IP address by clicking the network button:
As you can see on the following picture, the menu contains an item to copy to the clipboard the actual IP Address & Port Number. It is then easy to paste it into a chat session (e.g., Jitsi) or into an email.
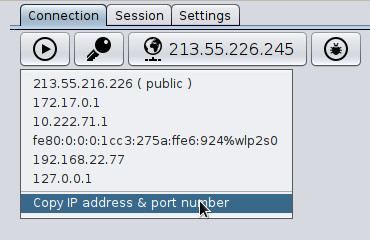
Note that this IP address is not required by the assistant application as it is listening on all the available network interfaces; but you need to communicate it to the assisted. (more on this later).
Press play
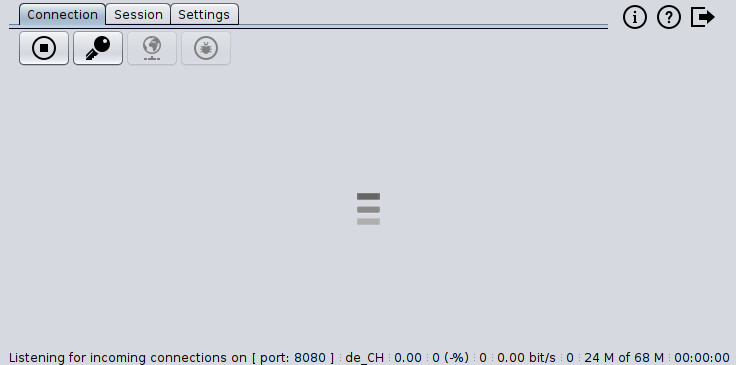
Now you can ask the assisted to connect. You'll be shortly prompted to accept the incoming connection:
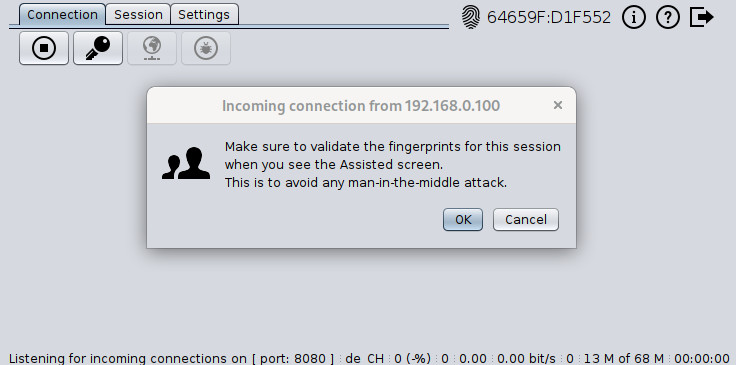
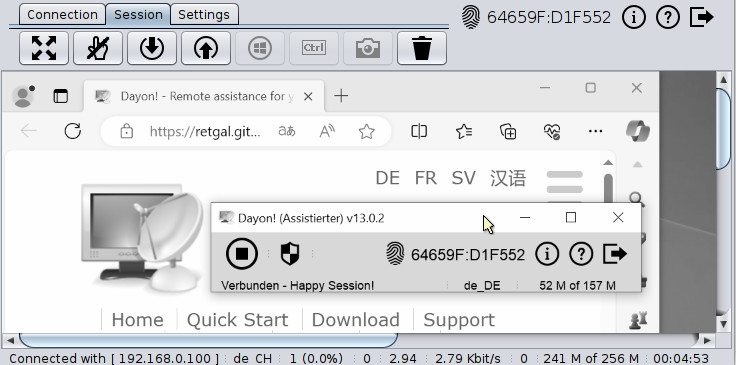
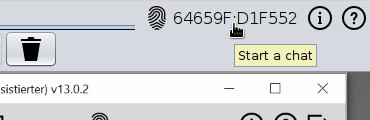
You are now connected to the remote computer and can see its desktop. Be sure to compare the certificate fingerprints of
the assistant and the assisted computer.
Caution: If they do not match, the connection is not trustworthy!
 Set up the Assisted computer
Dayon! Assisted is acting as a client application calling the outside world and as such there's no network configuration to set up.
Download and install the Dayon! application. Then start the Dayon! Assisted application and click the "play" button.

Enter the token communicated by the assistant and acknowledge with OK:
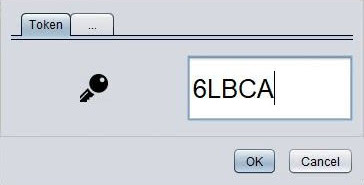
(if you have already connected to this assistant recently, then you can leave the field empty)
Alternative variant (connect without token):
Enter both the IP address and the port number as communicated by the assistant confirm with OK:
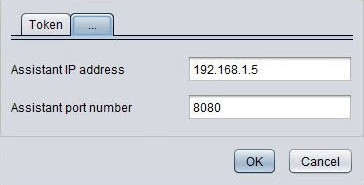
(both input fields can be cleared by double-clicking them)
You'll then be shortly connected to the assistant that is monitoring your screen. Enjoy!
Note: If you are unable to connect by following the instructions above, you should check that you have the right settings.
Managing the session
If the desktop of the assisted doesn't fit into your window, it can be scaled down:
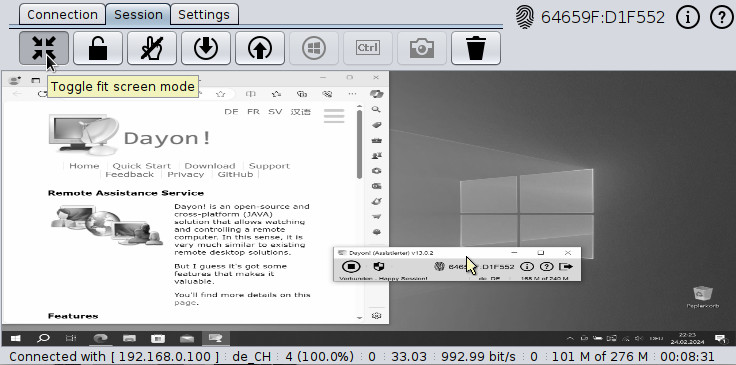
By clicking on the  button to the right,
you can maintain the aspect ratio of the assisted screen. Please note that this function has no effect on the display when the window is maximized.
button to the right,
you can maintain the aspect ratio of the assisted screen. Please note that this function has no effect on the display when the window is maximized.
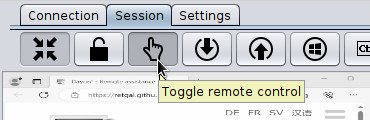
By default, the remote control mode is off; you can switch it on and off using the following icon:
Clipboard transfer
By clicking on the up- or down button, the clipboard of the assistant can either be transferred to the assisted (up) or the clipboard of the assisted to the assistant (down).
Currently supported are:
-
Text: Select text locally or in the assisted window, copy (
Ctrl + c), click up or down. Subsequently, the transmitted text can be inserted in a local or remote application (Ctrl + v). -
Files: Select one or more files locally or in the window of the
assisted person (
Ctl + c), click up or down. Subsequently, the file(s) can be inserted at the destination. - Graphic: If the clipboards content is a graphic, for example after taking a screenshot - just click up or down. The clipboard containing the graphic can then be used at the destination.
Send a Windows or Cmd key press
To send the press of the *Windows key, click the Windows button in the assistants control panel:
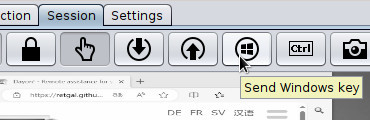
The key remains pressed until you click the button again. This allows you to send Windows key shortcuts.
If you need for example to minimize all windows on the assisted side, you would click the Windows
button, press the M key and then click the Windows button again.
*Note: If the assisted is running on macOS, the Cmd key/button is displayed/transferred instead.
Send a Ctrl key press
While most of the time, the Ctrl key gets transmitted to the assisted like any other keystroke,
there are situations where it's not. For example the combination Ctrl + Alt + Delete is generally
"captured" by the assistants operating system and thus not transmitted.
On such occasions the [Ctrl] button next to the Windows button in the assistants control panel becomes handy.
The behaviour is the same as with the Windows button: the key remains pressed until you click the button again.
So for sending the Ctrl + Alt + Delete combination to the assisted, you have to click the [Ctrl] button first,
then press the Alt and Delete keys together, release them and finally click the [Ctrl] button again.
Caution: Due to restrictions of the operating system, the combination Ctrl + Alt + Delete
does not work on assisted that run under Windows! Instead, use the combination Windows + R
which provides similar functionality.
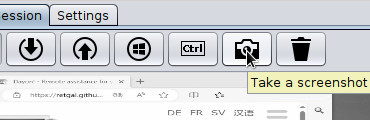
Take a screenshot at the assisted
Click the "Camera" button - the screenshot will be taken directly without further questions. The captured graphic ends up in the clipboard of the assisted, from where it can be transferred to the assistant.
Reset screen capture
The reset screen capture (trash bin icon) resets the capture interval (tick) to the configured one,clears all cached screen data and reloads a new screen capture from assisted.
Start an online meeting to chat face to face
Click on the certificate fingerprints on both assisted and assistant to start a joint online meeting in Jitsi.
Statistics Counters

The status bar of the assistant frame is displaying, in addition to the keyboard layout, the following counters:
- Network Bandwidth
- Compression Ratio: how many times the initial capture (diff only) has been compressed
- Number of Tiles: the number of tile being transmitted over the network as well as the cache hits.
- Number of Skipped Capture: the number of screen captures that have been skipped because of a too high rate (i.e., low tick value) for the CPU. To minimize that number you have to slow down the capture rate using a bigger tick value.
- Number of Merged Capture: the number of screen captures that have been merged before being transmitted. This is due to a capture rate too high for the current compression method. To minimize that number you have to slow down the capture rate and/or change the compression method using a faster one.
- Memory usage
- Duration of the active or the last support session
That's all folks! You can find more information on the settings page.